Google plans to remove support for the aging Secure Sockets Layer (SSL) version 3.0 protocol in Google Chrome 40, which is expected to ship in about two months.
The decision comes after Google security researchers recently discovered a dangerous design flaw in SSL 3.0. Dubbed “POODLE,” the vulnerability allows a man-in-the-middle attacker to recover sensitive, plain text information like authentication cookies, from a HTTPS (HTTP Secure) connection encrypted with SSLv3.
Even though POODLE is the biggest security issue found in SSL 3.0 so far, it is not the protocol’s only weakness. SSL version 3 was designed in the mid-1990s and supports outdated cipher suites that are now considered insecure from a cryptographic standpoint.
HTTPS connections today typically use TLS (Transport Layer Security) versions 1.0, 1.1 or 1.2. However, many browsers and servers have retained their support for SSL 3.0 over the years—browsers to support secure connections with old servers and servers to support secure connections with old browsers.
This compatibility-driven situation is one that security experts have long wanted to see change and thanks to POODLE it will finally happen. The flaw’s impact is significantly amplified by the fact that attackers who can intercept HTTPS connections can force a downgrade from TLS to SSL 3.0.
Based on an October survey by the SSL Pulse project, 98 percent of the world’s most popular 150,000 HTTPS-enabled sites supported SSLv3 in addition to one or more TLS versions. It’s therefore easier for browsers to remove their support for SSL 3.0 than to wait for hundred of thousands of web servers to be reconfigured.
On Oct.14, when the POODLE flaw was publicly revealed, Google said that it hopes to remove support for SSL 3.0 completely from its client products in the coming months. Google security engineer Adam Langley provided more details of what that means for Chrome in a post on the Chromium security mailing list Thursday.
According to Langley, Chrome 39, which is currently in beta and will be released in a couple of weeks, will no longer support the SSL 3.0 fallback mechanism, preventing attackers from downgrading TLS connections.
“In Chrome 40, we plan on disabling SSLv3 completely, although we are keeping an eye on compatibility issues that may arise,” Langley said. “In preparation for this, Chrome 39 will show a yellow badge over the lock icon for SSLv3 sites. These sites need to be updated to at least TLS 1.0 before Chrome 40 is released.”
Google Chrome typically follows a six-week release cycle for major versions. Chrome 38 stable was released on Oct. 7, meaning Chrome 40 will probably arrive towards the end of December.
Other browser vendors have taken a similar course of action in regard to support for SSL 3.0. Microsoft released a FixIt tool Wednesday that allows users to disable SSL 3.0 in Internet Explorer and Mozilla plans to disable SSL 3.0 by default in Firefox 34, which will be released on Nov. 25.
The critical Shellshock vulnerabilities found last month in the Bash Unix shell have motivated security researchers to search for similar flaws in old, but widely used, command-line utilities.
Two remote command execution vulnerabilities were patched this week in the popular wget download agent and tnftp client for Unix-like systems. This comes after a remote code execution vulnerability was found last week in a library used by strings, objdump, readelf and other command-line tools.
GNU Wget is the go-to utility for downloading Web-based files and resources on a Linux system using the command-line interface. In addition to being used manually, wget is commonly called by custom scripts and scheduled tasks—cron jobs on Linux.
“Wget versions prior to 1.16 are vulnerable to a symlink attack (CVE-2014-4877) when running in recursive mode with a FTP target,” said HD Moore, the chief research officer at Rapid7 who found the vulnerability, in a blog post Tuesday.
“This vulnerability allows an attacker operating a malicious FTP server to create arbitrary files, directories, and symlinks on the user’s filesystem,” Moore explained. “The symlink attack allows file contents to be overwritten, including binary files, and access to the entire filesystem with the permissions of the user running wget.”
Ultimately, the vulnerability can lead to remote code execution.
Users should either upgrade to wget 1.16 or make sure their Linux distribution ships a wget package that has the CVE-2014-4877 patch applied. The flaw can also be mitigated by manually adding the line “retr-symlinks=on” in the /etc/wgetrc or ~/.wgetrc settings files, Moore said.
Tnftp is a cross-platform port of the original BSD FTP client. It is the default FTP client in NetBSD, FreeBSD, DragonFly BSD and Mac OS X, but it is also available in many Linux distributions.
A vulnerability patched this week in tnftp allows a malicious server to execute arbitrary commands on the user’s system. The issue is being tracked as CVE-2014-8517.
“If you do ‘ftp http://server/path/file.txt’; and don’t specify an output filename with -o, the ftp program can be tricked into executing arbitrary commands,” said NetBSD’s security officer Alistair Crooks in a message to the Open Source Security mailing list Tuesday. Crooks’ email also included a patch created by the NetBSD developers.
The tnftp package shipped with OpenBSD is not vulnerable due to some changes made to the code some time ago, according to a reply by OpenBSD developer Stuart Henderson.
Debian, Red Hat, Gentoo and Novell have posted security advisories about the tnftp issue.
Crooks said that he also informed Apple about the flaw, which is present in OS X 10.10 (Yosemite), but only received “a boilerplate reply” from the company.
The flaws found this year in OpenSSL, Bash, strings and now wget and tnftp indicate a trend of new bugs being found in old code, said Rob VandenBrink, an incident handler at the SANS Internet Storm Centert, in a blog post Thursday. “Coders who wrote stuff in C back in the day didn’t always write code that knew how much was too much of a good thing. Now that we’re all looking at problems with bounds checking on input data, expect to see at least a couple more of these!”
The danger is that these flaws are found in utilities that a lot of people use every day. As VandenBrink puts it they “are part of our standard, trusted toolkit.”
Built-in trackpad gestures are getting beefed up in Windows 10. During TechEd Europe on Tuesday, Microsoft’s Operating Systems Group vice president Joe Belfiore debuted a few new touchpad gestures coming to the Windows 10 preview in the coming weeks.
Windows 8 and 8.1 already offer a number of gestures for PC users such as pinch to zoom and pan and scroll, but some of the more useful trackpad shortcuts—such as fast app switching—are still missing. Not for long!
The impact on you at home: After inspiring horror and outrage from mouse-and-keyboard PC users with Windows 8, Microsoft is piling on the goodies for desktop types in Windows 10. Windows 10 already includes support for multiple desktops, the Start menu (albeit reinvented), and the new task view. Now you’re going to be able to use Mac-ish trackpad gestures in Windows 10—which, of course, helps to further blur the line between traditional computing and touch-based interfaces.
Three-finger salute
The new gestures are reminiscent of what you can find on the Mac. With the new gestures in Windows 10 you’ll be able to swipe down with three fingers to reveal the desktop, and reverse that motion to return all your open windows. Once all your open apps are on the desktop, you can also use a three-finger upward gesture to reveal the new task view in Windows 10.
Microsoft is also giving you a Mac-style gesture to replace Alt-tab for switching between apps on the keyboard. Three fingers to the right or left will let you choose which app you’d like.
Microsoft is making the trackpad changes to Windows 10 to create a more unified experience for the next version of Windows. “In the past, touchpads on Windows have really been done very differently, because OEMs do them,” Belfiore said. “With Windows 10 we’re adding support for power users in a touchpad where multiple finger gestures...can make you really efficient.”
Beyond gestures, Windows 10 will also be improving inside edge detection (again) for multi-monitor Snap on Windows 10. Snap automatically resizes desktop app windows to take up half the space of a monitor when you drag an app window to the side of the screen.
The only problem is that Snap currently doesn’t work (in Windows 10 or 8.1) on the inside edge (the virtual gap) in a multi-monitor set-up—meaning anyone who wants to Snap to the inside edge of the desktop in Windows 8.1 must use the Windows Logo key + directional arrows keyboard shortcut.
In an upcoming addition to the Windows 10 preview, you’ll be able to snap to the inside edge using a mouse, trackpad, or keyboard shortcut—your choice.
It’s not clear when exactly the new features are headed to us mere mortals previewing Windows 10, but look for an update soon.
If you’d like to check out Belfiore’s keynote you can see it on MSDN’s Channel 9 live streaming page just rewind the video to around (1:56).
The newest enterprise edition of the Suse Linux distribution allows administrators to go back in time, for instance, to immediately before they made that fatal system-crippling mistake.
Suse Linux Enterprise Server 12 (SLES 12) features a system snapshot and rollback capability that allows the user to boot the system to an earlier configuration, should the latest one unexpectedly fail.
Such a capability can be handy for undoing a system configuration change that did not turn out as expected. For instance, an administrator might have the SLES computer in a perfectly fine running state, but then install a botched software update, or make a change that destroys the kernel. Typically, Unix systems have been unforgiving about such mistakes, forcing the administrator to reinstall the system software from scratch, should they not know how to undo the unfortunate change.
“This stuff happens, for whatever reason,” said Matthias Eckermann, Suse senior product manager. “So the admin has an emergency exit, so to speak.”
Users of Microsoft Windows and Apple Macintosh systems have long enjoyed rollback functionality within their respective OSes, but this capability had been missing in Unix-based systems such as Linux, at least as a native function of the OS.
For this functionality, the Suse team used the Btrfs file system (B-tree file system, often pronounced as “Butter FS”), an open-source file system developed by Oracle engineer Chris Mason (now at Facebook). Mason created Btrfs to address emerging enterprise requirements such as the ability to make snapshots and to scale across multiple storage nodes.
Although Btrfs is supported in the mainline Linux kernel, SLES is the first major Linux distribution to use Btrfs as the default file system. “Over the last five years, we specifically focused on making Btrfs enterprise-ready,” Eckermann said.
The rollback capability also relies on the open-source tool Snapper, first developed by Suse, to manage the snapshots.
The Suse team integrated Snapper with SLES so that users now have the ability, when the OS is first being loaded, to boot into an earlier snapshot of the system. “Whoever installs SLES 12 gets this capability by default,” Eckermann said.
SLES also integrated Btrfs with the Samba Windows file server, which makes Linux files accessible to Windows machines. For Windows users, SLES can now make multiple snapshots of a file appear as different versions of a file, which are all accessible.
Initially, Enterprise Suse supports rollbacks for only system changes, though users can also deploy it to handle changes in a user’s home directory, in which data is typically kept. “We already have it running, but it is not supported,” Eckermann said. Users can continue to use ext3, ext4 or some other traditional Linux file system as their default.
SLES 12, released Monday, comes with a number of other features as well. Like other distributions, SLES has caught the fever for Docker containers and now comes with a built-in framework to run this virtualization technology. For the first time, the package also provides geo-clustering, which allows the user to build replicate clusters across different geographic regions.
An organization could use geo-clustering, for instance, to set up multiple copies of a single cluster in data centers around the world, so if one or more regions go offline, the others can continue operations unabated, Eckermann said.
Suse is among the world’s most widely used distributions of Linux, along with Ubuntu/Debian, and Red Hat Enterprise Linux. A free version is available under OpenSuse and Suse Linux offers a commercial edition packaged for enterprise usage.
Suse Linux’s parent company, Attachmate, is in the process of merging with Micro Focus. Eckermann expects no major changes in the operations of Suse Linux resulting from the new ownership.
SLES 12 is offered at an annual subscription of US$349 per server. A free 60-day trial is also available.
After reading my article on killing unwanted processes, Joe Balbona asked how he could keep those processes from loading in the first place.
There’s no direct correlation between the programs that load when you boot and the processes slowing down your PC six hours later. Many autoloaders (programs that automatically load when you boot) do their thing and then close down properly. And some programs you load manually long after the boot leave processes running even after you’ve closed them.
Nevertheless, most Windows PCs load way too many programs at boot time. These definitely slow the boot process. Some remain running and can slow Windows. And some may cause conflicts and instability, although that’s rare.
So let’s see how we can trim your autoloaders.
[Have a tech question? Ask PCWorld Contributing Editor Lincoln Spector. Send your query to answer@pcworld.com.]
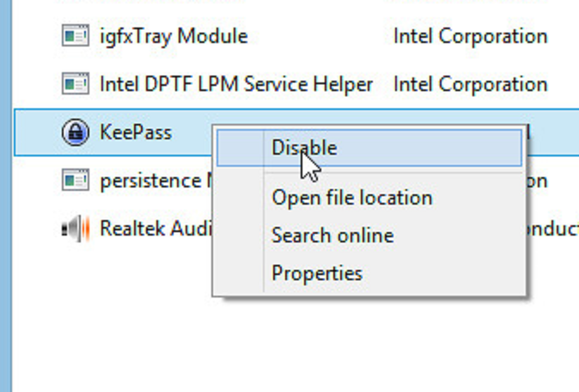
The fact that you like a program doesn’t necessarily mean you want it running all the time? For instance, regular readers know how much I like KeePass. But I turned off its autoloader because I just didn’t see the point. A password manager only needs to run when you need a password. On the other hand, your antivirus program needs to watch over your PC constantly, so it’s a legitimate autoloader.
Windows 8 significantly changed how we manage autoloaders. I’ll therefore give you two separate sets of instructions.
Windows 7 and earlier versions
Click Start, type msconfig, and press Enter. This brings up the System Configuration page.
Click the Startup tab for a table listing your autoloaders. Now you can uncheck those you don’t want.
But first, you have to figure out what each autoloader does. Usually the program’s name makes it obvious. But sometimes the names aren’t clear.
If the name isn’t helpful, you can usually get an idea by examining the Manufacturer and Command columns in the table. These will tell you who published the software, and where the file is on your drive (usually the folder for a program you installed). If all else fails, use your favorite search engine to find more about the name.
Remember that you can always experiment. Uncheck something and see if that makes things better or worse. The last column, Date Disabled, provides a record of what you’ve just unchecked.
Windows 8
In the old-fashioned Desktop environment, right-click the taskbar and select Task Manager. Once it’s up, click the Startup tab.
This table doesn’t give as much information as the old Msconfig one, but it’s easier to read. And if you know where to look, the information is there.
One particularly useful column is the last one: Startup impact. It tells you—in admittedly vague terms—how much that program slows boot time. This can help you decide what to remove.
To disable an autoloader, right-click it and select Disable.
And take a look at the other options on that context menu. Open file location shows you where the program is located on your hard drive—a good clue about who put it there. And if you really can’t figure it out, select Search online to see what the Internet says about this program.
Unfortunately, this Startup tool lacks Date Disabled information. If you’re going to experiment with disabling various autoloaders, make a note about which ones you just disabled. That way, if something fails, you can fix it.
Krishna Bam asked about cleaning out his temp folder.
As the name implies, the temp folder contains files that are only needed temporally. Unfortunately, these files don't always get deleted after their job is done, resulting in wasted drive space.
To open the temp folder, click Start or go to the Windows 8 Search charm, type %temp%, and select the folder that appears.
[Have a tech question? Ask PCWorld Contributing Editor Lincoln Spector. Send your query to answer@pcworld.com.]
Once there, you can manually delete files and subfolders. But you probably can't delete all of them. Windows won't let you do away with those currently in use. That's fine. You don't want to delete those ones anyway.
In fact, you really don't want to delete any files created since the last time you booted your PC. So if you shut down Windows every night (and I mean shut it down, not sleep or hibernate), and boot clean every morning, you can safely delete any files in Temp not dated today.
Better yet, you can use an old-fashioned, DOS-style batch file to automatically clean out the folder every time you boot. Here's how:
Open Notepad, and type or paste these two lines:
rd %temp% /s /q md %temp%
Save the file as %appdata%\microsoft\windows\start menu\programs\startup\cleantemp.bat. This will create the batch file, cleantemp.bat, inside your Start menu's Startup submenu. Everything in that menu loads automatically when you boot.
Yes, Windows 8 doesn't have a Start menu. But it still has the folder. And the trick still works. Backward compatibility can be a wonderful thing.
Microsoft will continue to sell low-end phones with the Nokia brand and has licensed the brand for these type of devices.
The company is meanwhile preparing to roll out its new Microsoft Lumia brand, Tuula Rytilä, senior vice president of marketing for phones at Microsoft, said in an interview posted late Thursday on the Conversations blog, which will also move to the Microsoft website.
“Our global and local websites are going through a transition as we speak and in the coming days our social channels will get a new name too—they will be called Microsoft Lumia,” Rytilä said. “This work continues across our devices, packaging and retail, to name a few.”
Microsoft completed in April this year the acquisition of Nokia’s smartphone business for over US$7 billion.
Besides continuing to offer Nokia-branded entry-level phones like the Nokia 130, the company will continue to also sell and support Nokia Lumia smartphones that are in the market, such as the recently announced Lumia 830 and Lumia 730/735, Rytilä said. Nokia 130, a mobile phone that does not have an Internet connection or apps, was unveiled in August.
The executive said that Microsoft was looking forward to unveiling a Microsoft Lumia device soon, without giving a specific date. She described the change in brand as “a natural progression” as all devices that once came from Nokia now come from Microsoft.
The new Microsoft Lumia brand is likely to be aimed at clearing the confusion that arose from the continued use of the Nokia brand even as a company by the same name continues to operate, after the sale of the devices business to Microsoft. Nokia in Espoo, Finland, is now focused on networking gear, its Here navigation service and a technology development and licensing business.
Microsoft is likely to have decided to retain the Nokia brand for the low-end market as it “resonates with this segment of users,” said Vishal Tripathi, a principal research analyst at Gartner.
The company could not be immediately reached for comment.
The transition to the new Microsoft Lumia brand was first announced on Nokia France’s Facebook page.
Microsoft is continuing its crusade to get CIOs interested in Windows 10, touting new security features that include two-factor authentication built directly into the OS.
The effort to bake two-factor authentication into Windows 10 is intended at doing away with the old single-password method that has proven so insecure in recent years and has led to so many instances of system break-ins and data theft, according to Microsoft. With two-factor authentication, malicious hackers need to be in control of two pieces of information in order to break into a system, such as a password and a code sent to a user’s device like a smartphone.
Overall, Windows 10 will offer businesses enhanced security in areas like identity protection and access control, information protection and threat resistance, since security “has been central to many of the customer conversations I’ve had since we announced the availability of the [Windows 10] Technical Preview,” wrote Jim Alkove in the blog post, referring to the pre-release version of Windows 10 that is publicly available for testing.
In the area of identity and access control, Windows 10 will offer IT managers the necessary functions to protect user credentials and devices with two-factor authentication, without having to rely on third-party products, he wrote.
“We believe this solution brings identity protection to a new level as it takes multi-factor security which today is limited to solutions such as smartcards and builds it right into the operating system and device itself, eliminating the need for additional hardware security peripherals,” Alkove wrote.
More specifically, Windows 10 will let users enroll their devices as one of the two authentication factors, with the second being either a pin or a biometric input, such as the reading of a fingerprint.
“From a security standpoint, this means that an attacker would need to have a user’s physical device—in addition to the means to use the user’s credential—which would require access to the users PIN or biometric information,” he wrote.
The credential can be either a key pair generated by Windows, or a certificate provisioned for the device by a company’s existing PKI system. “Providing both of these options makes Windows 10 great for organizations with existing PKI investments and it makes it viable for the web and consumer scenarios where PKI backed identity isn’t practical,” he wrote.
The new user credentialing system will be supported by Microsoft’s Active Directory, Azure Active Directory, and consumer Microsoft Accounts “so enterprises and consumers using Microsoft online services will quickly be able to move away from passwords.”
Windows 10 will also have features to protect the user access tokens generated as part of the authentication process, so that they’re not vulnerable to techniques like Pass the Hash coupled with advanced persistent threats.
“With Windows 10 we aim to eliminate this type of attack with an architectural solution that stores user access tokens within a secure container running on top of Hyper-V technology. This solution prevents the tokens from being extracted from devices even in cases where the Windows kernel itself has been compromised,” he wrote.
In the area of information protection, Windows 10 will have a data loss prevention (DLP) technology baked in that distinguishes between personal and corporate data, and protects the latter using “containment.”
“Protection of corporate data in Windows 10 enables automatic encryption of corporate apps, data, email, website content and other sensitive information, as it arrives on the device from corporate network locations,” he wrote.
Windows 10's new Start menu and windowed Metro apps.
The DLP technology will also work on Windows Phone, and documents will be covered by this protection as they’re accessed from different desktop and mobile devices.
IT managers will be able to establish policies that control which apps can access corporate data, and Windows 10 also extends VPN control options to protect this data in devices owned by employees.
“App-allow and app-deny lists will enable IT professionals to define which apps are authorized to access the VPN and can be managed through MDM solutions for both desktop and universal apps,” he wrote, adding that administrators can also restrict access by specific ports or IP addresses.
Finally, in the area of threat and malware resistance, Windows 10 will have features to lock down devices and only allow users to run apps that have been signed using a Microsoft provided signing service.
“Access to the signing service will be controlled using a vetting process similar to how we control ISV publishing access to the Windows Store and the devices themselves will be locked down by the OEM,” he wrote. “The lockdown process OEMs will use is similar to what we do with Windows Phone devices.”
IT administrators will be able to determine which apps they consider trustworthy, such as those they sign themselves, those signed by ISVs, those available on the Windows Store, or all of them.
“Ultimately, this lockdown capability in Windows 10 provides businesses with an effective tool in the fight against modern threats, and with it comes with the flexibility to make it work within most environments,” he wrote.
Microsoft is aiming to ship Windows 10 by mid-2015, and in the meantime it’s publicly testing in an open program which recently topped 1 million participants and has generated 200,000 feedback items.
After Windows 8 was thoroughly ignored by Microsoft’s enterprise customers, the company is bending over backwards in its attempts to make CIOs and other enterprise IT executives pay attention to Windows 10.
As the OS goes through its pre-release public testing, it’ll become clearer whether the Windows 10 security improvements that Alkove is trumpeting today end up being compelling enough for business customers.
Microsoft has published a temporary fix for a new zero-day flaw that affects nearly all versions of Windows and is currently being exploited via PowerPoint.
The flaw affects all Windows releases except Windows Server 2003, the company wrote in an advisory Tuesday. It can be exploited if a user is coaxed into opening a malicious Office file containing an OLE (object linking and embedding) object. OLE can allow a user to edit a PowerPoint file from within a Word document, for example.
“At this time, we are aware of limited, targeted attacks that attempt to exploit the vulnerability through Microsoft PowerPoint,” the company said.
A successful attacker would gain the same rights as a logged-in user and could put other programs on an infected computer. Microsoft said some attacks that compromise accounts without administrator rights may pose less of a risk.
The fix, which Microsoft calls the ”OLE packager shim workaround,” is for 32- and 64-bit versions of PowerPoint 2007, 2010 and 2013.
Microsoft said attacks could take place via email, with the attacker sending a potential victim a malicious file or by luring a person to a compromised website containing “specially crafted content.”
“An attacker would have to persuade the targeted user to visit the website, typically by getting them to click a hyperlink that directs a web browser to the attacker-controlled website,” Microsoft wrote.
The User Account Control feature in Windows will display a consent or elevation prompt during an attack, depending on the privileges of the user before the malicious file is run, Microsoft said. UAC is enabled by default on Vista and newer OSes.
Earlier this month, on Patch Tuesday, Microsoft released eight security bulletins, which fixed three zero-day vulnerabilities at the same time, a rare occurrence.
Argos starts selling low-cost windows phones and tables branded as Bush Smartphones and tablets, which is its entry-level in windows devices. Argos is known to sell home entertainment solution in its respected country, and now entering into smartphone market with Windows-based devices.
Bush Windows Phone with Free SIM:
Argos first low cost windows phone available with free sim in black color just in £69.95. You will everything in this smartphone what you find in other like, Xbox, Cortana, Live Tiles, windows Phone 8.1 OS, Windows Phone store, Music, and more.
In this low cost, you will get Qualcomm Snapdragon processor, with 512MB RAM, 4GB of Internal Memory, 64Gb extendable. This phone also features Display resolution of 800×480 px which is pretty good in low cost smartphones. The Only thing which is not found up to the mark is Camera, which is just 0.3 mega pixel.
Screen size of Bust windows phone is not mentioned but with height, width and depth (H1260, W640, D105mm.) dimensions we can assume that it matches somewhere Lumia 520, which is about 4 inch in size.
Barrety capacity of this phone is also not mentioned. Only using hours are mentioned which are 2075 hrs on standby and 540 min on talk time, which in my opinion not considered good. So in my opinion the battery capacity is somewhere between, 1300-1600 mAh.
Buy Bush Windows Phone SIM Free
Bush Mytablet Windows 8 inch – 16GB (£129.99):
Display:
Resolution 1280 x 800 pixels.
Multi-touch screen.
Support for simultaneous display of multiple languages.
Windows 8 users have always had many problems with the Windows Store, but Microsoft has relentlessly tried to come up with fixes every time. Today we’re talking about an update that takes of some problems with Windows apps.
As part of update KB 2919355, Microsoft has recently released an update that takes care of some annoying problems related to the updating process of the Windows Store apps. So, the problems appears when if you have a Windows 8.1-based device that is connected to the Internet through a proxy and you configure Windows Store to obtain updates automatically; these don’t get through.
READ MORE: Latest Firefox Version for Windows 8 Improves Video Streaming and the Viewing Experience
So, by installing the aforementioned update, you will make sure that Windows Store apps will be updated automatically, if you have selected this option from the menu.
Microsoft also informs that this problem occurs when you use a statically configured Proxy Auto Configuration (PAC) file. What’s nice is that there’s a hotfix available, as well, so follow the links from below to download it. Still, make sure that you have the mentioned KB install on your machine before downloading them.
Download the Update for Windows Server 2012 R2 Download the Update for Windows 8.1 Download the Update for Windows 8.1 for x64
Frank Hammond asked how to access the AppData folder and copy files from it.
The Application Data—or AppData—folder contains data created by programs. Almost every program you install creates its own folder in AppData and stores information there. At least in theory, users don’t have to worry about these files.
But in reality, you probably do. For instance, my personalized Microsoft Word templates and Sticky Notes file all reside inside AppData. If you’re using an older version of Outlook, that program’s data is probably in AppData, as well.
[Have a tech question? Ask PCWorld Contributing Editor Lincoln Spector. Send your query to answer@pcworld.com.]
Finding this folder isn’t easy if you don’t know the tricks. The AppData folder resides in your user folder—the same location that contains Documents, Music, and other library folders (unless you’ve moved them elsewhere). But unlike those folders, AppData is hidden.
Unless you’ve told Windows to display hidden files and folders, you won’t see it. And if you can’t see it, you can’t click it.
But there’s a trick that will get you into the folder. Click Start or go to the Windows 8 Search charm, type %appdata%, and select the Roaming file.
Why Roaming? Because the %appdata% environment variable doesn’t actually point to the AppData folder. It points to the Roaming folder inside AppData.
This sort of makes sense. The Roaming folder contains the lion’s share of all the files in AppData—including the ones you’re most likely to need access to.
And if you really want to get to the actual AppData folder, once you’re in Roaming, click AppData in the Path field at the top of the window.
Once there, you should have no trouble copying files—or backing them up. However, I’d be very cautious about moving or deleting them. Doing so might break a program.
Usually, whenever Microsoft releases its monthly Patch Tuesday updates, there are a bunch of problems related to the update files. Here are the problems related to this months’s release. Let’s have a look at some more details.
We’re getting some new reports of recent botched patches that are causing a lot of problems for Windows users – especially Windows 8, but also Windows 7 ones. If you too have been affected by these problems yourself, leave your comment below and let us know the exact details. This will help rectify these botched updates and hopefully, Microsoft will issue a fix via the Windows Update feature in the near future.
Botched update KB 3000061
This is a kernel mode driver update from MS 14-058, one of Microsoft’s zero-day patches this month. And here’s one of the users describes a problem with installing KB 3000061 on a Windows 8.1 computer. This could be replicated on others, of course, but this is what we know so far:
After rebooting it started the configuring and then gave an error “Failure configuring windows updates, reverting changes” After restarting Windows update still showed the same 18 updates. I ran the update troubleshooter from http://support.microsoft.com/kb/949358 and it showed that it fixed 3 errors. Same thing happened when I tried installing all the updates from the control panel. I then installed all the updates one at a time and everything worked OK except KB3000061. I ran the troubleshooter again and manually installed KB3000061. Same error on reboot.
READ ALSO: New Windows Tablet Dell Venue 8 Pro to Get Price Cut to Just $159?
Botched update KB 2984972
This update enables the Remote Desktop Connection client to perform restricted administration logons and also enables the Remote Desktop Service that is running on an RD host to perform restricted administration. Here’s how some recent problems have been described as:
AutoCAD itself was not affected but Revit, Navis, DWG TrueView all were. Not got to the bottom of why yet (the explanation for the update does not sound like it would make any difference) but simply removing the update from client PCs fixes the packages which will do me for now.
Harjit Dhaliwal, on the Patch Management forum, also added his input:
Heads up, KB2984972 on Server 2008R2 RD server caused issues with our Wyse thinclients – it caused them all to span desktops across multiple monitors rather than presenting multiple monitors to the host OS. After uninstalling & rebooting clients are presented with multiple monitors again.
Botched update KB 2949927
This adds SHA-2 hashing support to Win7 and Server 2008 R2 and here’s how some of the concerns surrounding it sound like:
All 3 of my own Win2008R2SP1 servers got stuck in a triple auto-reboot Windows Update Failure this morning. All had 16 updates… They did eventually recover after 2 or 3 auto-rollback reboots… Checking updates on them all now shows this one still to install: Security Update for Windows Server 2008 R2 x64 Edition (KB2949927)
Sombeody else from the TechNet forum says:
KB2949927 will fail to install and revert the changes at the next boot if you have BitLocker disabled. The “fvevol” service must be started, and it must be registered in the “LowerFilters” value under this registry key: HKEY_LOCAL_MACHINE\SYSTEM\CurrentControlSet\Control\Class\{71a27cdd-812a-11d0-bec7-08002be2092f}. If you don’t have it, KB2949927 will fail!
Botched update KB 2995388
This one is said to be causing problems with VMware. Here’s how problems sound like:
After installing the patch, every time you try to boot a virtual machine, you get a message: “Not enough physical memory is available to power on this virtual machine with its configured settings.” The VMware folks recommend you not install KB 2995388; if you have, they recommend that you uninstall it.
Have you encountered any of these issues? Sound off below.
READ ALSO: New 12-inch Windows Model in the Acer Aspire Switch Series Incoming
Have you gotten the error code 0xc00000e9 in Windows 8 or Windows 10? Well this error usually appears from a hardware malfunction and to be more precise most of the time is because of a communication error between the hard drive and the system. You will see by reading the lines below how you could fix this and also how you managed to get this error in the first place.
Because there could be a software issue as well as a hard drive failure in Windows 8 or Windows 10 we will see below what we could do for bought of them and fix our Windows operating system. Also as a reminder follow the tutorial posted below in the order presented to lower your troubleshooting time and get back to your daily activity.
Tutorial on how to fix in Windows 8 or Windows 10 the error 0xc00000e9
First option:
Shutdown you’re Windows 8 or Windows 10 device.
After the shutdown process is completed take a look at the USB ports into your device and disconnect all USB cables except the one for your keyboard and the one for the mouse.
Start your device as you normally do.
Check and see if you still get the error code 0xc00000e9.
If the error code does not appear anymore then you will need to plug in one device at a time respecting the same procedure above.
If you notice that after you plugged in the Printer for example you get this error code then you will have to change the USB cable to the printer in this case and also update the driver for the printer to support the Windows 8 or Windows 10 operating system.
Second option:
Move the mouse over to the lower right side of the screen.
You will have the charms bar open.
Left click on the “Settings” feature in the Charms bar.
Left click on “Change PC settings” feature in the “Settings” menu.
On the left side of the window you will have to left click on the “Update and Recovery” feature.
Left click on the “Recovery” feature.
On the right side in the window you will have “Advanced startup”.
In the “Advance startup” feature left click on the “Restart now” button.
Now you will have to wait for the Windows 8 or Windows 10 device to reboot.
After the reboot it will take you directly to the “Advanced startup” feature.
Now in the “Advanced startup” feature you will have to select the “Automatic repair” feature and follow the instructions on the screen.
After the “Automatic repair” feature is finished then you will need to reboot your Windows 8 or Windows 10 device and see if you still have this issue. Note: Another way you can access the “Automatic repair” feature is to place in your DVD device the Windows Media disk and access it directly from the CD.
Third option:
You will have to take into account that the Hard Drive in your device may be damaged. In this case if you have another hard drive than you can try to plug it in and see if that is the error code 0xc00000e9 is appearing because of the old hard drive.
If your hard drive is causing the issue then I suggest taking it to a specialized repair shop and telling them exactly what the issue with your device is and what error code you get when you try to boot into the system.
Please let us know in the comments section if this tutorial was helpful for you and also write us any questions regarding this issue and we will see how we can help you further.
READ ALSO: Fix: Error Code 0x80246017 When Downloading Windows 10 Preview Build
Windows 10 is already available for download in its first Technical Preview form, and it’s been said that there are at least 1 million users who have already signed up for the Windows Insider Program. But here we have the first problems.
Many users are interested in the features and functionalities of the upcoming Windows 10, but they are overlooking the fact that right now, we’re talking about the first preview build, which, obviously is half-baked. Microsoft has advised numerous times that we should install it on a machine that we’re not using often or on a virtual machine.
Here’s what one affected users has been saying about error code 0x80246017 when downloading the Windows 10 Preview Build:
I am trying to download the newest preview build, but when I press “Download Now” the error code “0x80246017″ appears with the message “Failed to download the new preview build, please try again later. 0x80246017″. I am on the x64 version of the Technical Preview.
How to fix it
Here’s what a Microsoft support representative said:
You will want to change the registry keys back to values that the public update servers will recognize and give you newer builds as they become publicly available for Windows Insiders. If you did change the registry keys a refresher on what they should be is as follows:
Computer\HKEY_LOCAL_MACHINE\SOFTWARE\Microsoft\WindowsSelfHost\Applicability BranchName = fbl_release ThresholdRiskLevel = low ThresholdInternal = <should not exist> ThresholdOptedIn = <should not exist>
He also added that you can use these commands from and Admin Command prompt (Windows Key + X, select Command Prompt (Admin))
There are many other solutions offered, but this is the single one coming from Microsoft, so I recommend you to try this one and see if it solves your problems. Leave your comment below and let us know how did it go.
READ ALSO: Fix: ‘Your PC Ran Into a Problem and Needs to Restart’ in Windows 8, Windows 10
Was there a time when you were working or playing a video game on your new Windows 8 or Windows 10 operating system and you got the “your PC ran into a problem and needs to restart” error message? Don’t be alarmed because you will see the reason as why you’re Windows 8 is acting like this and also the steps you need to take to fix this issue.
If you accidentally deleted or perhaps because a specific program deleted registry files from your System 32 folder you have in your Windows partition then you will most likely get the error message “your PC ran into a problem and needs to restart”. Also if your memory in Windows 8 or Windows 10 device is running at a higher percentage than your operating system accepts then you will also get this error message.
Note: The high percentage of memory usage can be caused by a specific application that you may have installed recently.
How to solve “your PC ran into a problem and needs to restart” in Windows 8 and Windows 10
First option:
Move the mouse cursor over the lower right side of the screen to open the Charms bar.
After the Charms bar is opened you will need to type in the search box “Command Prompt”.
Left click on the “Command Prompt as Administrator” icon after the search is finished.
Write in the Command Prompt window the following command : “SFC /SCANNOW” without the quotes.
Press the “Enter” button on the keyboard.
Let the SFC scan finish and see if you still have the same error message appearing after this.
Second option:
Go to the desktop in your Windows 8 or Windows 10 by left clicking the “Desktop” icon on the start menu.
Right click on the “My Computer” icon you have on the desktop.
Left click on the “properties” feature you are presented.
Left click on the “Advance” tab in the upper side of the Properties window.
Under the “Startup and recover” topic left click on “Settings”
Under the “System Failure” topic you will need to uncheck the box next to “Automatically restart”.
Under the “Write debugging information” topic left click on the dropdown menu and left click again on the “Complete memory dump” feature.
Left click on the “OK” button.
Left click on the “Apply” button to save the changes.
Reboot your Windows 8 or Windows 10 device.
Check to see if you still have the error “your PC ran into a problem and needs to restart”. Note: In case you still have this issue I would suggest you take the device to the store where you bought it from because it is most likely a hardware malfunction.
Now that you have two ways on how to fix the error “your PC ran into a problem and needs to restart” you only need to apply them and fix your issue in Windows 8 or Windows 10. Also write us below for any other issues regarding this subject and we will help you further with this case.
READ ALSO: Fix: ‘Red X Volume Icon’ in windows 8, Windows 10
If you get a red x volume icon in the lower right corner of your screen in Windows 8 or Windows 10 than this is the tutorial you should read. Many users have issues with the red x volume icon in their system right after they upgraded to Windows 8, Windows 8.1 or Windows 10.
The red x volume icon usually appears in Windows 8 and Windows 10 when either you have a hardware issue and your speakers are not working or in most of the cases there is a software malfunction after an update of the operating system due to the fact that not all the drivers you had are compatible with the new Windows 8 or Windows 10 operating system you newly installed on your device.
Tutorial for fixing red x volume icon in Windows 8 and Windows 10
First option:
Before we go to the software part of this red x volume icon we will first have to check if your hardware is operating in the necessary parameters.
Move the mouse pointer over the lower right side of the screen for the “Charms” bar to open.
Left click or tap on the “Settings” feature you have in the charms bar.
In the search box you are presented in the “Settings” feature you need to write “Device Manager”.
After the search is finished you will need to left click or tap on the “Device Manager” icon.
If you are prompted by a window you will need to type in the administrator account and password to go further with the steps below.
Double click (left click) on the “Sound, video and game controllers” feature in the device manager window.
In the expanded menu in the “Sound, video and game controllers” feature look to see if you have there a sound card and if it is properly installed. Note: if it is not properly installed you will see a yellow sign next to it or you won’t have a sound card present in that menu.
If you have a yellow sign next to the sound card you will need to left click on that icon.
Left click on the “Properties” feature after you clicked on the sound card.
Left click or tap on the “General” tab you have in the properties window.
You will have a box under the “Device status” feature and you will see in that box what exactly the issue with the sound card is. Note: In most of the cases you will need to update the sound card driver .
Second option:
Check if you have made the proper connections to the speakers and the audio system.
Check the wiring from the speakers to the Windows 8 or Windows 10 device.
Check the HDMI cable if you have one on the audio system.
If you have a USB connection to the audio system you will need to check if it is plugged correctly to the device.
Third option:
Check and see if your audio system is plugged into the power socket and if it is lighting up.
Check and see if your audio system has the volume to a minimum or disabled completely.
Move the mouse pointer to the lower right side of the screen to open the Charms bar.
In the Charms bar you will need to left click or tap on the “Search” feature.
Type in the “Search” feature “Adjust system volume” and wait for the search to finish.
Left click after the search on the “Adjust system volume” icon that appeared.
In the new feature that you opened you will need to increase the volume by moving the slider all the way to the upper side of the bar.
Be sure you don’t have your “Mute” button enabled because this is very common in this situation.
Forth option:
Go on the manufacturer’s website and see if the driver for your audio card is compatible with the Windows 8 and Windows 10 operating system.
If the driver is not compatible you will need to download the latest version of the driver for Windows 8 and install it to your system.
Now that you have your red x volume icon gone in Windows 8 or Windows 10 you can go and listed to some relaxing music or perhaps even watch a movie. Write us below for any other issues that you encounter on this subject and we will help you as soon as possible.
READ ALSO: How to Fix ‘Error 651′ in Windows 8.1, Windows 10
If you are using either a wireless connection or have a cable internet connection and you upgraded to Windows 8.1 or Windows 10 you might experience some issues regarding the error 651 that basically prevents you from using your internet connection as you should. This error is usually caused by a registry issue and will probably not recognize your Router or Hub device.
You will see that if you are using other devices in order to connect to your Wireless internet connection they will work, this is mainly an issue from your Windows 8.1 or Windows 10 system. You don’t have to worry anymore because we will see below a tutorial on how to fix the error code 651 in your system and it will only take you a couple of minutes of your time.
How to fix error 651 in Windows 8.1 and Windows 10
First option:
You will need to restart your Windows 8.1 or Windows 10 and log in to your Safe Mode with networking feature in order to apply the following changes.
While in Safe mode you need press and hold the “Windows” button and the “R” button.
A “Run” window will appear.
Write in the “Run” window the following command “MSCONFIG”.
Press the “Enter” button on the keyboard.
Now another window will show and you will need to left click on the “Boot” tab situated in the upper side of that window.
In the topic “Boot options” you need to left click on “Safe boot”.
Check the box next to “Network” under the “options” section of the page.
Reboot your Windows 8.1 or Windows 10 device and check if you still have the error 651 appearing in your system.
Second option:
Press and hold the “Windows” button and the “R” button.
In the “Run” window that appeared write “MSCONFIG”.
Press the “Enter” button on the keyboard.
Left click on the “Boot” tab.
Uncheck the box next to “Safe mode”.
Left click on the “General” tab.
From the features you have there you need to go to “Selective Startup”
Uncheck the features to clear the selections.
Left click on the “Services” feature and left click again on “Disable all” button.
Left click on the “Startup” tab and disable each item you have in that list.
Reboot your Windows 8.1 or Windows 10 device.
After the device reboots go again to the “MSCONFIG” window as you did above.
Left click on the “Services” tab.
Left click on the “Hide all Microsoft services” feature.
Left click on the “OK” button you have on that window.
Reboot your Windows 8.1 or Windows 10 device again.
Check to see if you still have this issue.
If you don’t have this error anymore it means that one of your startup apps is causing the error 651 issue.
If you still have these issues go back to the “MSCONFIG” window.
Left click on the “General” tab.
Left click on “Normal Startup” feature.
Choose to Reboot the Windows 8.1 or Windows 10 device.
Third option:
When your Windows 8.1 or Windows 10 powers up on the start screen you need to left click on the “Desktop” icon.
While in your desktop you need to double click on the “My Computer” icon to open it.
Double click on the “C:/” drive to open it.
In the “C:/” drive double click on the “Windows” folder to open it.
In the “Windows” folder find the “System 32” folder and double click on it to open.
In the “System 32” folder double click on the “Drivers” folder to open it.
In the “Drivers” folder you will need to search for the “rasppoe.sys” file.
Rename that file “rasppoe.sys” . Note: You can rename t he file “rasppoe.sys_backup” so that you will still have it when you are done.
Download a new “rasppoe.sys” file from the internet and copy it in that specific folder where you had the old one. Note: After you download this file you should unzip the contents and then copy it to your “Drivers” folder.
Reboot the Windows 8.1 or Windows 10 device and see if you still have this issue. Note: If you want to put the old “rasppoe.sys” file in the “Drivers” folder you can delete the one you downloaded and rename the old one you saved above. Rename the “rasppoe.sys_backup” file to “rasppoe.sys” and reboot the device.
So you now know how to fix your Windows 8.1 or Windows 10 error 651. Please write us below if this article was helpful and if it fixed your error 651 issue in Windows 8.1 and Windows 10.
READ ALSO: Fix: Update Error 0x80072EE2 in Windows 8.1, Windows 10
The error message “0x80072EE2” you get in Windows 8 and Windows 10 is because of the update feature you have in the Windows 8.1 or Windows 10 systems. It will basically prevent you from updating your system as your system is supposed to do. This error can be caused by several reasons and we will see a bit below what is causing this Error 0x80072EE2 to appear and also how we could fix this.
When Windows 8 or Windows 10 is unable to connect to the update server you usually get the error 0x80072EE2. Basically if your Windows operating system does not receive a response from the update server in a specific time frame then you will get this error message. This can be caused by having a poor internet connection, your Windows 8 or Windows 10 Firewall blocks your access to the update server or perhaps you have a system malfunction in your Windows 8.1 or Windows 10 that interrupts the communication with the update server.
Steps on how to solve Error 0x80072EE2 in Windows 8.1 and Windows 10
First step:
Make sure you have a working internet connection. You can open your internet explorer for example or any other browser you have installed on your Windows 8.1 or Windows 10 and try to access a website. Note: You can access www.google.com for example and see if your internet connection is working properly.
If your internet connection is not working properly I would suggest calling your internet service provider and find out what exactly is the issue.
Second step:
If the internet connection is not the problem then you will have to turn off your Windows 8.1 or Windows 10 firewall just for the duration of this trial and see if this is the reason that caused the error 0x80072EE2 to appear.
Left click on the “Start” button you have in your Windows 8.1 or Windows 10 system.
Left click on the “Control Panel” feature you have in the “Start” menu.
You will have a search box presented in the “Control Panel” feature in which you will need to write “Firewall” without the quotes.
After the search is finished left click on the “Windows Firewall” icon you have there.
Left click on the link that says “Turn Windows Firewall On or off” situated on the left side of the window.
You might be prompt for an administrative account and password in which case you will need to type in the administrator account and the password.
Now you will have to left click in the “Public network settings” topic on the “Turn off Windows Firewall (not recommended)”.
Now you will have to left click in the “Private network settings” topic on the “Turn off Windows Firewall (not recommended)”.
Left click on the “OK” button you have in the lower side of this window to apply the changes you made.
Check and see if you still get the error 0x80072EE2 after your Windows Firewall is turned off.
If you still have this error message after you did the above steps then you need to turn on your Windows Firewall by following the same steps above and select the option to “Turn on Windows Firewall”
Third step:
If the steps above did not worked for you and you still have this error message then we will try to add the update server address to your trusted websites in Windows system to see if this is the root cause of the issue.
Open your Internet explorer application.
Left click on the “Tools” tab you have in the upper side of internet explorer.
Left click in the “Tools” menu on “Internet Options”.
Left click on the “Security” tab you have in the upper side of the “Internet options” window.
Left click on “Trusted Sites” option you have in the “Security” window.
Left click on “Sites”.
Select the check box to clear the “Require server verification (https:) for all sites in this zone” feature.
You will have a topic there that says “Add this website to the zone”. There you will have to type in the following addresses: http://update.microsoft.com and http://windowsupdate.microsoft.com.
Left click on the “Add” button after you typed in the addresses above.
Left click on the “OK” button to save your settings.
See if you still have this error message after you did the steps above.
If you don’t get the error 0x80072EE2 anymore then leave the addresses you saved above in trusted websites section.
So one of the steps posted above should solve your 0x80072EE2 error code and also prevent it from ever happening again. Please write us below in the comments section your opinions on this article and also if you need any more help on this particular issue.
READ ALSO: This Free Software Fixes Common PC Problems in Windows 8, Windows 10
It may seem like mixing oil and water, but as it turns out, installing Windows on your Mac isn’t a violation of natural law—your Retina display won’t melt or anything!
In fact, doing so is actually a relatively pain-free process. To give the Windows 10 Technical Preview—a very early pre-release version of Windows 10—a whirl, you don’t even have to pay for a Windows license or already have Windows on your Mac. The Technical Preview is free to test.
Intrigued? Let’s dig in.
Decisions, decisions
There are two ways to get the Windows 10 Preview on your Mac.
The first is to install Windows on a separate partition of your hard drive using Apple’s built-in Boot Camp software. When finished you can boot directly into Windows, essentially transforming your Mac into a full-blown Windows PC.
Get Chrome or your other favorite apps on Windows 10.
Another option lets you run Windows as a virtual machine inside an OS X program. We’ll be using the open-source VirtualBox from Oracle, though Parallels Desktop is a popular alternative (it costs about $80). A virtual is the route we recommend, given that the Windows 10 Technical Preview is still in very early form, with the occasional rough edge or bugginess popping up. If something goes wrong on a virtual machine, it won’t affect your hardware or OS X installation—you can just wipe it and start over.
The Windows 10 Start menu is back, and you can have it on your Mac.
As with any pre-release software, one person’s experience may vary with another’s. Mine was pretty issue-free: I installed Windows 10 on a late 2014 MacBook Pro with a 2.6GHz i5 processor and 8GB of RAM. Any Mac released in recent memory should be able to run Windows 10 just fine.
Whatever you do, . Didn’t you hear the part about the Windows 10 Technical Preview being very early experimental software? You don’t want to lose all your valuable documents and family videos if Microsoft’s OS hiccups.
Download the ISO
Done backing up? Good. First we’ll head to the Windows 10 download site to download the Technical Preview. You’ll have to sign up for the Windows Insider Program by giving Microsoft your email address.
After registering—note all the warnings about this being pre-release software, and Microsoft’s stern warnings about backing up your data—select the version of Windows 10 that’s right for your particular system. If you’re running a relatively recent Mac with an Intel processor, opt for the 64-bit version. It’s nearly 4GB, so get comfy—the download may take a while. Jot down the product key, too; we didn’t need it in our testing but it’s a good thing to keep in your back pocket just in case.
Install Windows 10 in VirtualBox
Let’s explain how to get Windows 10 running in a virtual machine first, since that’s our recommended method. Head to the Oracle VM downloads page, and select the VirtualBox version built for for OS X hosts.
Launch the download, dragging the icon into the Applications folder. Included is a 300-page PDF if you want a thorough set of instructions—though you can skip those and keep reading this if you don’t have time or desire to brush up on VirtualBox’s most arcane secrets.
At the VirtualBox launch screen, you’ll be asked to choose which operating system to install. I chose “Windows 8.1” from the menu, as it’s the most recent version of Windows. Windows 8 should probably work out as well—just be sure to select the appropriate 64-bit or 32-bit option based on the version of Windows 10 you downloaded.
Choose Windows 8.1 from the long list and get ready for some virtual computing.
VirtualBox will then ask you how much RAM to allocate to running the virtual machine. You can go with the default of 2048MB if you’re concerned about system resources, but Windows 10’s performance will increase if you can dedicate more—you are running another operating system simultaneously, after all. If you can bump it up to 4GB without starving OS X’s own resources, that’d be perfect.
Next you’ll be asked to create a virtual hard drive for Windows 10. Unless you’re planning on doing extensive work or installing more software, you can safely choose the default of 25GB. Select the VirtualBox Disk Image option on the next screen and continue.
Locate the ISO file for VirtualBox and get ready to install Windows.
The next choice is to select a dynamically allocated hard drive or fixed one. As you can probably figure out from the context, the former grows as you add space, and it’s a better choice if you’re short on space and don’t plan on adding that much to your Windows mock computer. The fixed drive, on the other hand, will give you faster performance as long as you can spare the room.
Locate the ISO file for VirtualBox and get ready to install Windows.
When all that’s done, highlight the Windows 10 VM in the VirtualBox dashboard and select the green “Start” arrow. You’ll be prompted to point the VM towards the Windows 10 ISO file. After doing so, you’ll see the Windows logo with a black background. You’re on your way!
The Windows signup screen will appear next. Pick a language and hit Install now. Then you’ll have two choices: a custom or upgrade installation. Select custom, then choose a specific location on the hard drive for installing Windows. Just leave this as it is—it’s installing to the virtual hard drive created by VirtualBox.
This is the first screen you’ll see when installing Windows 10.
Now it’s time to install Windows and plug in your Microsoft account credentials. If you don’t have an existing account, you’ll need to put in an email address to satisfy the Windows gatekeepers. This enables you to save and sync settings across multiple Windows devices.
Voila! You’re running Windows 10 on your Mac. You’ll probably want to check out PCWorld’s guide to exploring Windows 10.
Running a virtual machine is a slightly different experience than running an operating system on a hard drive. Things may move a little slower and appear janky. But it works fine for getting basic work done, or just plain playing around with Windows 10.
When you’re done, just close the VM’s window as you would anything else. You’ll be prompted either to save the machine’s state as-is or power it off.
Using Boot Camp with Windows 10
If you want the full Windows Technical Preview experience, you can use Apple’s Boot Camp tool to install Windows 10 straight to your hard drive and boot directly into Windows. (You did remember to back up your data first, right?)
For this you’ll need a USB drive with at least 4GB of free space. Boot Camp will take the Windows ISO file and create a boot disk that can be used to install Windows on your Mac.
Boot Camp Assistant is your friend for installing Windows.
Assuming you already have the Windows 10 ISO downloaded, launch Boot Camp. Tick all the boxes and proceed.
Insert your flash drive and then select the ISO file’s location. Boot Camp will then download all the necessary drivers to run Windows and transform your USB drive into a boot disk. This step takes a while, so be patient.
You’ll then be asked to partition your hard drive. This is a critical step, as you can’t expand or shrink the storage later on. Instead, you’ll have to wipe that part of the drive and start from scratch.
Decide how much hard drive space to devote to Windows.
It’s recommended you select at least 20GB, but 30GB or more is best, as Windows 10 itself will take up a sizable chunk. Consider how much you will be using it: Is it just for casually tinkering or do you want to install Office and do some serious work? If you want to play PC games, definitely bump up the free space you devote to Windows.
When you’re done, click Install to start (you guessed it) installing Windows 10.
Windows will next restart a couple of times. The longest wait will be when it hits the “We’re getting our apps ready” screen, which sat on my machine for 10 minutes. It does, however, cycle through some pretty colors for your viewing pleasure.
If for some reason your computer boots back to OS X, reboot and hold the Option key. This brings up a menu where you can select which operating system to launch.
A few impressions
Use the Boot Camp Assistant help menu for troubleshooting issues.
Overall, Windows 10’s performance on the Mac seems good. Scrolling with the trackpad works great with native Windows apps, such as File Explorer or Start menu, but it’s a little janky with browsers (I tried it with Chrome and Internet Explorer). I found myself reverting to clicking and holding the toolbar to scroll through a page. Windows doesn’t have as many trackpad gestures as OS X, either, so using a mouse may be a good idea.
The brightness was a little inconsistent, fluctuating between too bright or too dark. The backlit keyboard was also confused: Trying to reduce its brightness didn’t work at all until the next-to-lowest setting, which then plunged the keyboard into near-darkness.
Such inconsistencies are to be expected with a pre-release operating system, however. If you run into trouble or want to check system requirements further, both Microsoft and Apple offer support pages. And if you want to return to Apple’s warm embrace, just hold down the Option key during a reboot and select OS X as your chosen OS.
Have you recently upgraded your system to the new Windows 8 or Windows 10? Seeing that some of our users have encountered some issues regarding the error “dns probe finished no internet” after the upgrade of the operating system I have decided to talk a bit about this particular error and the methods needed to solve it.
The “dns probe finished no internet” error usually appears when you try to access the internet via the Google Chrome browser even though the internet works fine on other internet browsers like Mozilla or Internet explorer for Windows 8. This will prevent you from accessing any kind of web pages until you fix it. So you will only need to follow the tutorial posted below for a quick fix on this error and prevent it from appearing again.
Steps on how to fix “dns probe finished no internet” error in Windows 8 and Windows 10
If you are using an internet router please save our current settings before you proceed with the steps below.
Press and hold the “Windows” button and the “X” button.
In the menu presented you will need to left click on the “Control Panel” feature.
In the “Control Panel” window you will need to double click (left click) on “Network and Internet” icon in order to open it.
Now look for the “network and sharing center” feature and left click on it.
In the right side of the “Network and Sharing center” window you will need to left click on the “Change adapter settings” link.
Now in the list of network adapters you will need to find the one you are using and right click on it.
After you right click the network adapter you will need to left click on the “Properties” feature presented there.
In the new Properties window you opened you will have to search for the “Internet Protocol Version 4 (TCP/IPv4)” option.
Double click (left click) on the “Internet Protocol Version 4 (TCP/IPv4)” option in order to open it.
After you selected the option above it will open another “Properties” window. Note: in this Properties window you will have access to the settings for the internet protocol.
Left click on the “Use the Following DNS server address:” feature to select it.
Now in the “Preferred DNS server” field put the following “208.67.222.222”.
In the “Alternative DNS server” field put the following “208.67.220.220”.
Check the box next to the “Validate settings upon exit” message situated in the lower side of the screen.
Left click on the “OK” button presented in the lower side of the screen.
Close the windows you have open.
Now you will have to look in the Routers settings and place the same DNS address and alternative DNS address as you did in the steps above.
After you configured the Router’s settings go to the Start button on the desktop.
Type the following text “CMD”.
Press the “Enter” button on the keyboard.
Left click on the Command Prompt icon you have after the search.
In the command Prompt window type the following text “IPCONFIG /ALL” without the quotes.
Press the “Enter” button on the keyboard.
You will have to search in the text that appeared for the name of the network adapter you are using.
Under your network adapter you should have there a field with “Physical address” and next to it you should have the following code or something similar to it “78-DD-08-F1-DF-B0”.
Now leave your command prompt window open and go again to the start button and write “NCPA.CPL” without the quotes.
Right click on the name of the network adapter you are using and left click on the “Properties” feature.
In the “Properties” window you need to left click on the “Configure” button.
Left click on the “Advanced” tab you have in the upper side of the window.
Left click on the “Network address” option you have there.
Left click on the “Value” feature you have in this window to select it.
In the “Value” field you will need to type the address you had saved a few rows above. Note: The example address was “78-DD-08-F1-DF-B0”, so you will need to type the address you have in the Value field except without the lines. For Example : “78DD08F1DFB0” without the quotes.
Left click on the “OK” button you have in the lower side of this window.
Restart your Windows 8 or Windows 10 device.
Also have a look at the network adapter manufacturer’s website and install the latest drivers.
If the above steps did not solve your problem then try disabling your Windows Firewall to see if this is the root cause of the error message.
Upgrade the browser you are having issues with to the latest version available for your Windows 8 or Windows 10 operating system.
So by following the steps posted above you will now have your internet connection working properly in your Google Chrome application. Please let us know by writing us below if this solution helped with your issue and what we can do to further assist you in the future.
READ ALSO: Easily Solve Windows 8.1, Windows 10 Shutdown Problems
It’s official: Most people who tried Windows 10 ignored our warnings.
Microsoft released some glowing Windows 10 stats on Monday. Already more than 1 million people have registered with Windows Insider to become a Windows 10 tester. Great! More than 200,000 suggestions or complaints have been filed via the Windows feedback app. Awesome! That’s what the Technical Preview’s for, after all. A full 64 percent of Windows 10 users installed the Preview straight to their hard drive.
Wait. What?
Granted, most people previewing Windows 10 in Technical Preview form are likely savvy computer users, but at this stage it’s still in a very early state, with bugs and rough edges. While Windows 10 is already more polished than most alpha software, using early pre-release operating systems is an invitation for catastrophe if any hiccups occur. The beauty of virtual machines is that you can just shut down the program and start over if disaster strikes. That’s why PCWorld’s Windows 10 installation guide recommends giving the operating system a whirl in a VM.
But only a third of all Windows 10 testers listened, it seems.
The Windows 10 Technical Machine running as a virtual machine.
Maybe most of you aren’t afraid to nuke and reinstall Windows 10 repeatedly if need be. Maybe the kind of person enticed by the Windows 10 Technical Preview is the kind of person who has a spare PC or two lying around. Or maybe I’m just bitter after the ISO-less Windows 8.1 Preview refused to update to the full version after its release and left my work laptop borked for months. Either way, the fact that only 36 percent of Windows 10 installations occur in virtual machines made me do a double take.
The precautions you need to take
There’s no denying that operating systems run better straight from the metal rather than virtualized, however—at least if you’re using a consumer PC. And for all my preaching, after installing the Technical Preview in a VM on my personal machine I did overwrite Windows 8.1 with it on my work laptop. I’m a sucker for punishment, I guess. Fingers crossed it doesn’t break again! (Consider this my premature apology to the IT department if it does.)
There are a couple precautionary steps you’ll want to take if you install the Windows 10 Technical Preview over your Windows 8.1 installation or on its own hard drive partition, however.
First and foremost, back up your data. Load up an external hard drive, subscribe to Carbonite, whatever you need to do—just do it! You don’t want Windows 10 to burp and wipe out crucial files. PCWorld’s backup guide and introduction to free backup tools can help if you need it.
Next, you’ll want to create a recovery drive for the operating system already on your PC. If you’re running Windows 7 or Vista, your PC’s maker hopefully included a recovery disc with the system, or a recovery partition on your hard drive. Skip down to the “Use your manufacturer’s recovery partition or discs (Windows 7 or earlier)” section of PCWorld’s How to reinstall Windows like a pro for details for more details.
Creating a recovery drive in Windows 8.
Windows 8 and 8.1 let you create your own recovery drive, however. Press the Windows key on your keyboard to land on the Start screen (the one with all the colorful tiles) and type “Recovery drive.” A list of search results will pop up on the right edge of your screen; select Create a recovery drive and follow the steps from there. It’s very straightforward. The vanilla option should fit on a 500MB flash drive, but if you’re backing up a retail PC with a recovery partition provided by the manufacturer, you’ll probably need a 16GB or larger USB drive.
Be warned: Creating a Windows 8 recovery drive wipes any data you may have already had on the thumb drive.
With backup and recovery drive in hand you’re ready to take the plunge and install the Windows 10 Technical Preview on your PC’s hard drive. Here’s hoping you never need to use the backups, but they’re invaluable if wonkiness does occur. If the mere idea of playing with pre-release operating systems makes you queasy, be sure to check out PCWorld’s pictorial guide to all the changes in the Windows 10 Preview.
Windows Phone 8.1 Russia manufacturers Highscreen is going to launch two windows phone named WinJoy and WinWin. Consumer Electronics brand HighScreen is owned by Vobis computer. The company is preparing to send the shelves of Russian stores its first smartphone running Windows Phone 8.1 in the near future. Therefore, on the official site is already possible to find information about new models with cheerful names WinJoy and WinWin.
WinJoy – First Cheapest Windows Phone from Russian Company:
Modern quad-core Qualcomm Snapdragon processor with a frequency of 1.2 GHz 200
4-inch display with a resolution of 800 x 480
512MB RAM, 4GB of built-in storage expandable via microSD
5MP main camera on the front and on the 0,3MP
Weighing in at 105g Dimensions 122.5 x WinJoy are 63.8 x 9.9 mm.
WinJoy equipped battery 1700 mAh.
The smartphone will be available in black, gray, blue and red colors.
Highscreen WinWin almost exactly the specs for your sibling WinJoy:
all the same Qualcomm Snapdragon 200,
512MB RAM, 4GB of storage and microSD,
5MP main camera and front 0,3MP
Differences yellow smartphone from its more cheap fellow lie in the battery 2000 mAh raised in connection with these
dimensions: 126 x 64 x 10.5 mm.
Also differs case design WinWin.
It is assumed that this smartphone will be of interest to those people who need a relatively long battery life.
WinJoy WinWin and will be available in the coming days. Smartphone with a weaker battery WinJoy can be purchased at the price of 3690 rubles, and more LPs WinWin – for as low as 3990 rubles.
Sometimes when you first install the Windows 8.1 or the Windows 10 operating system you might experience some shutdown problems during your usage. When you select the feature in Windows to reboot your system and your device is shutting down instead or perhaps when you select the shutdown feature and the device is going into sleep mode or it will just reboot your system.
The shutdown problems in Windows 8.1 and Windows 10 usually come along side the “Hybrid Shutdown” feature presented first in Windows 8 systems and also in Windows 8.1 and Windows 10 systems. This feature is meant to decrease your device’s start-up time but unfortunately when you have shutdown problems in most of the cases it is caused by this feature. You don’t have to worry because we will show you below how you can disable the “Hybrid Shutdown” feature and fix your Windows 8.1 or Windows 10 operating system.
How to fix shutdown problems in Windows 8.1 and Windows 10:
Method one:
Move the mouse cursor over the upper right side of the screen in order to open the Charms bar menu.
Left click or tap on the search feature presented there.
Type in the search box the following text “power” without the quotes.
Left click or tap on the “Settings” feature presented after the power search.
Left click or tap on the “Change what the power buttons do” feature presented in the left side of the window.
Now you should have in front of you the “System Settings” window.
You will have to go all the way to the end of the list presented in the right side of the “System Settings” window.
Find the feature “Turn on fast startup (recommended)” and uncheck the box next to it in order to disable this feature. Note: If this option is not available and you cannot check or uncheck the box next to it then you will have to go in that list all the way to the top and left click on the “Change settings that are currently unavailable” link in order to activate this feature.
Reboot the Windows 8.1 or the Windows 10 operating system.
Try shutting down your device and see if it reacts differently. If you still have issues with the shutdown feature after this then do the next method posted below.
Method two:
Press and hold the button “Windows” and the button “X”.
After you opened up the menu you will have to left click on the “Command Prompt as Administrator” to open it.
In the command prompt window you will need to write the following line “bcdedit /set disabledynamictick yes” without the quotes. Note: Be sure to type the command exactly how it is written above and include a space between the line “bcdedit /set disabledynamictick” and the “yes” word.
Press the “Enter” button on the keyboard.
Reboot the Windows 8.1 or the Windows 10 device and see if you still have this issue.
So now that you have above two methods on how to fix your shutdown problems in Windows 8.1 and Windows 10 you can go carry on your normal activity on the Windows device. Also if you have any other questions on this topic please let us know by writing us a few words in the comment section below.
READ ALSO: How to Remove Bing Search Bar in Windows 8, Windows 10

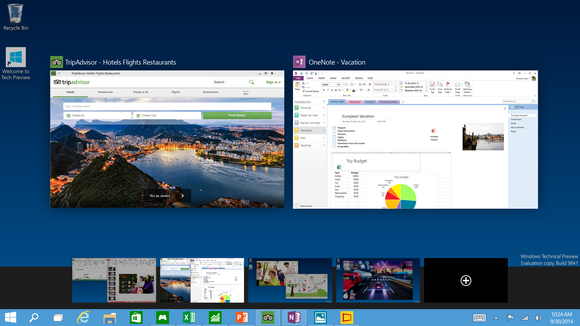 Image: Microsoft